Donnerstag, 26. April 2018

Factor Two Ryzen Java Performance Gain

Standard benchmarks you can find on the internet are of limited value when you use your machine
for serious computations based on your own code. My machines often run for several days utilizing
all available CPU cores, so performance is a serious issue, as is power consumption considering the
insane power price we pay here in Germany.

After AMD released the Ryzen processor I was quite disappointed by their multi threaded
performance at my application. Recently I found out what was the source of the problem and that
it can be solved. I want to share this information in case someone faces a similar issue.
Finally it seems Ryzen Threadripper 1950x, if configured and used correctly, can handle an incredible
amount of workload. It turned out, that for multi threaded Java applications heavily using JNI there
are huge improvements using Java 9 or Java 10 compared to Java 8 I haven't found documented
anywhere yet. These improvements are already significant for Intel CPUs, but quite dramatic for
AMD Ryzen.

Space Flight Trajectory Optimization

Since the movie "The Martian" space flight optimization got introduced to a wider audience

There is a world wide yearly competition around this topic called GTOC
https://sophia.estec.esa.int/gtoc_portal where I am participating since 2010.

Optimizing trajectories requires a lot of CPU resources. How much is dependent on:

a) CPU
b) Operating System
c) Efficiency of the used algorithms
d) JDK/Java/JVM version - my implementation is in Java + C++ called via JNI.

In order to be competitive I always try to improve on all four fronts.

Used Hardware / Software

As operating system I use Linux Mint 18.2 (based on Ubuntu 16.04). The base optimization algorithm I
use is called "CMA Evolution Strategy" https://arxiv.org/pdf/1604.00772.pdf , which scales very well
with the number of CPU cores and outperforms the popular particle swarm optimization algorithm

My two Threadrippers 1950x are used in Numa/local memory mode
restricting the number of threads to 16 for each optimization run. This way, executing two optimizations
in parallel - each using 16 threads in "NUMA" mode - I got the CPU fully utilized, which was not
possible using the default "UMA" mode. In "NUMA" mode the 1950x is more or less equivalent to
two Ryzen 8-cores, but with much less combined power consumption.
As CMA-ES implementation a C++ variant of my Apache Commons Math contribution of the CMA-ES
algorithm https://github.com/apache/commons-math/blob/master/src/main/java/org/apache/commons/math4/optim/nonlinear/scalar/noderiv/CMAESOptimizer.javais used, which additionally supports mirroring and multi threading. This C++ code is called from Java
using JNI.

Flying to 2016 HO3

To reproduce the performance issue with Java 8 I used two real world application scenarios related to
the search for a trajectory from earth to asteroid (469219) 2016 HO3, the smallest and closest Earth
quasi-satellite - see https://arxiv.org/pdf/1608.01518.pdf .

The trajectory is computed in two phases:

1) Monte Carlo search to find the optimal start / landing time
2) Optimization of the final transfer using a low thrust (ion thruster) flight model.

Both are quite typical space trajectory design / optimization tasks.

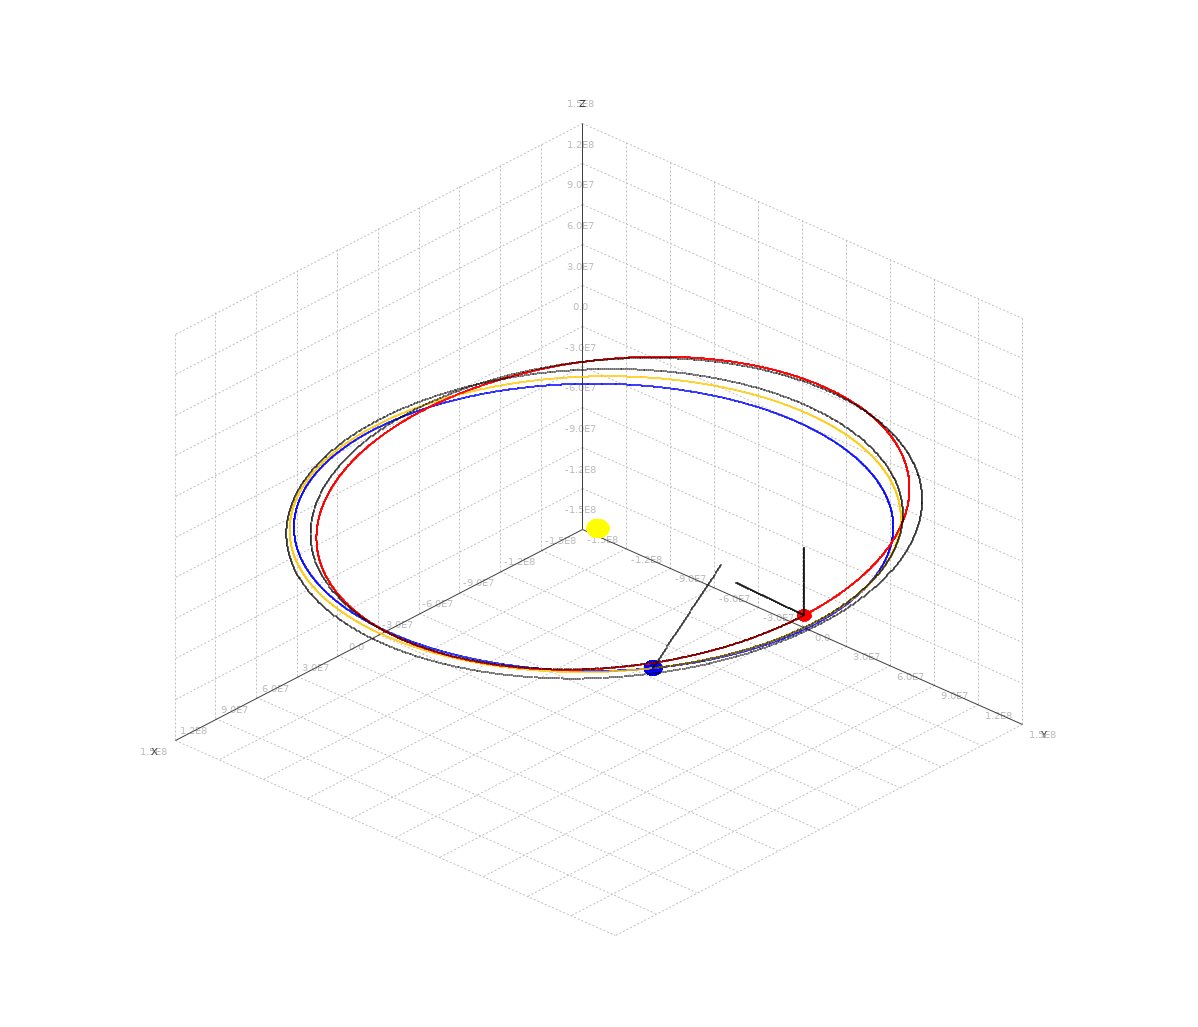
Here is a computed transfer (black) from earth (blue) to 2016 HO3 (red):
Java performance evaluations are tricky, you need a ramp up phase executing the code without
measuring to wait for the JVM to optimize / compile the code which it does dynamically after evaluating
internal performance metrics. Then we perform 20 runs and report both the mean value and the
standard deviation of these 20 timings.

For Java 8 we used “Java HotSpot(TM) 64-Bit Server VM (build 25.171-b11, mixed mode)”,
for “Java 9  "OpenJDK 64-Bit Server VM (Zulu build 9.0.4.1+11, mixed mode)”,
for Java 10 “Java HotSpot(TM) 64-Bit Server VM 18.3 (build 10.0.1+10, mixed mode)”.

Monte Carlo Search Benchmark

For the Monte Carlo search we run 1000 CMA-ES optimizations each evaluating 5.000 times a
5-segment lambert arc flight path approximation. On Ryzen 16 CMA-ES optimizations are executed
in parallel, where each CMA-ES optimization is single threaded. Since I don't have a new Intel
machine I used an older 6-core i7-6800K CPU @ 4.0GHz for comparison, where 12 optimizations
are executed in parallel. Using Java 8 the old i7-6800K easily outperforms the Ryzen @ 3.9Ghz.

Results for i7-6800K CPU @ 4.0GHz

20 runs
mean
sdev
min
max
Java 8
10462 ms
64 ms
10359 ms
10595 ms
Java 9
8137 ms
152 ms
8024 ms
8558 ms
Java 9 2nd  parallel exec
16705 ms
314 ms
16298 ms
17500 ms

On the Intel processor we see already a hefty 25% performance gain using Java 9.

Results for AMD Ryzen Threadripper 1950X @ 3.9GHz

20 runs
mean
sdev
min
max
Java 8
12326 ms
251 ms
11717 ms
12839 ms
Java 9
5725 ms
360 ms
5127 ms
6622 ms
Java 9 2nd  parallel exec
5874 ms
389 ms
5421 ms
6970 ms
Java 10
5906 ms
264 ms
5496 ms
6543 ms

These results show a serious problem for the Ryzen/Java 8 combination. Only using Java 9 or Java 10
the Ryzen can outperform the old Intel 6800k, it is more than twice as fast than with Java 8.

CMA-ES Final Optimization Benchmark

For the final transfer optimization we execute a single multi threaded CMA-ES optimization evaluating
200.000 times an 8-segment low thrust flight model using the GraggBulirschStoerIntegrator from
Apache Commons Math. Since only the function evaluations are executed in parallel, we have much
less CPU utilization and the Java 9 advantage is less dramatic.

Results for i7-6800K CPU @ 4.0GHz

20 runs
mean
sdev
min
max
Java 8
15551 ms
297 ms
14705 ms
16003 ms
Java 9
14825 ms
666 ms
13123 ms
15757 ms

On the Intel processor we now see only a moderate advantage for Java 9. But regardless of the Java
version Ryzen is superior. Would be interesting to see how newer Intel processors perform here.

Results for AMD Ryzen Threadripper 1950X @ 3.9GHz

20 runs
mean
sdev
min
max
Java 8
10895 ms
471 ms
9818 ms
12187 ms
Java 9
9641 ms
180 ms
9313 ms
10017 ms
Java 10
10395 ms
974 ms
9564 ms
13213 ms

Difference between Java versions is similar to the Intel results, again Java 9 is the winner.
The Java 8 / Ryzen multithreading problem seems related to CPU utilization which is much lower in
this experiment.

We also tried a new 8-core Ryzen 2 2700x processor, which can be slightly higher clocked than the
1950x, but showed nevertheless very similar results - of course it makes no sense to execute a
second run in parallel on the 2700x since it has only 8 cores.

To illustrate that the used algorithms are competitive: https://youtu.be/7QxikroB-6Q shows a solution
for the GTOC4 competition
which is significantly better than the solution which won the competition.

Donnerstag, 10. Dezember 2015


How to debug Kong plugins on Windows and Mac-OS


Introduction


Kong is an open-source API management system based on NGINX, which aims to secure, manage and extend APIs and Microservices. It is written in Lua and supports a plugin oriented architecture. Debugging of Lua code is supported by different IDEs like ZeroBrane Studio http://studio.zerobrane.com/ and Eclipse Lua http://www.eclipse.org/ldt/ but nevertheless the setup of a development environment supporting debugging of Kong plugins on Windows and Mac-OS machines is not trivial.
This tutorial describes how to create an environment for creating, configuring, testing and debugging of a "Hello-World" Kong plugin both on Windows and Mac-OS. We used Windows 7/64 and Mac-OS "El Capitan", but the description should work also for newer Windows and older Mac-OS versions.

The preferred method is based on the Vagrant distribution of Kong (https://github.com/Mashape/kong-vagrant). Since there is no Windows distribution of Kong this is the only option if you work on Windows. Using Kong Vagrant images requires Lua remote debugging. ZeroBrane Studio currently seems the only IDE supporting this scenario. For Mac-OS we describe as an alternative a brew based installation at the end of this tutorial. 


Prerequisites


As a prerequisite you need to install Vagrant https://www.vagrantup.com/downloads.html , VirtualBox https://www.virtualbox.org/wiki/Downloads , SoapUI http://www.soapui.org/downloads/latest-release.html and ZeroBrane Studio http://studio.zerobrane.com/download . We experimented with Eclipse Lua LDT https://eclipse.org/ldt/#installation but didn't succeed with remote debugging kong plugins running in a vagrant image.

For windows we need a Unix shell, we recommend installing git https://git-scm.com/download/win which comes with a bash shell for windows which can be started right clicking on a directory in explorer.

Setup a Vagrant Kong Image


Next we follow the documentation in https://github.com/Mashape/kong-vagrant/blob/master/README.md to setup a kong vagrant image using bash either on Windows or MacOS. First start VirtualBox, then open a terminal and run the following commands on your host machine.

# clone the Kong repo and switch to the next branch to use the latest, unrelease code
$ git clone https://github.com/Mashape/kong
 
# clone this repository
$ git clone https://github.com/Mashape/kong-vagrant
$ cd kong-vagrant/

Create an empty directory /path/to/kong/clone/ on your machine which later is mounted inside the vagrant image:

# start a box with a folder synced to your local Kong clone
$ KONG_PATH=/path/to/kong/clone/ vagrant up

The vagrant location of this mounted host folder is /kong.

# SSH into the vagrant box
$ vagrant ssh


Clone Kong to your host for debugging in ZeroBrane Studio


We need to do some preparations necessary for debugging our kong plugin:

# copy all kong lua files from the vagrant image to the mounted host folder
$ sudo adduser $USER vboxsf
$ cp -r /usr/local/share/lua/5.1 /kong
 
# relocate the vagrant kong lua files, link to the mounted host folder
$ sudo -i
$ cd /usr/local/share/lua
$ mv 5.1 5.1.old
$ ln -s /kong/5.1 .

Now the directory  /usr/local/share/lua/5.1 on the vagrant image points to its copy on the host machine. Local changes there will also affect the vagrant kong installation.

Since ZeroBrane Studio can only debug files inside one source file tree (the project location) we need to copy the kong entry point into the mounted lua source tree:

$ mkdir /kong/5.1/bin
$ cp /usr/local/bin/kong /kong/5.1/bin
 
# Copy the kong configuration file to the same location
$ cp /usr/local/lib/luarocks/rocks/kong/0.5.3-1/conf/kong.yml /kong/5.1/bin


Install ZeroBrane Studio on your Vagrant image


Next we need to install the linux distribution of ZeroBrane Studio in the vagrant image , download https://download.zerobrane.com/ZeroBraneStudioEduPack-1.20-linux.sh and copy it onto the part of the file system shared with the vagrant image. Inside a vagrant ssh execute:
sh ZeroBraneStudioEduPack-1.20-linux.sh
You may see some error messages related to GUI installation you can ignore since we are only interested in the lua/so files required for remote debugging located in /opt/zbstudio/lualibs.


Create a Kong plugin using ZeroBrane Studio


Now, back to the host, start ZeroBrane Studio and set the project directory to /path/to/kong/clone/5.1, our shared copy of the kong lua files (Project/Project Directory/Choose).

Next we create a sample "HelloWorld" plugin as described in http://streamdata.io/blog/developing-an-helloworld-kong-plugin/.
First the plugin configuration located in kong/plugins/helloworld/schema.lua:


Then the handler inheriting from BasePlugin.lua in kong/plugins/helloworld/handler.lua:


And finally the plugin implementation in kong/plugins/helloworld/access.lua:


Note that we added the required path definitions for lua debugging here. You have to replace the IP adress inside the require('mobdebug').start("172.20.0.55") command by your IP adress. To find out your IP adress on Windows use

$ ipconfig
On MacOs you may use

$ ifconfig |grep inet

We placed the require('mobdebug') call inside the "execute method". This is because this method is executed in a separate coroutine, triggered by the Mockbin webservice call. Coroutines are not debugged by default. Alternatively coroutine debugging can be enabled by adding a require('mobdebug').on() call. This has a similar effect then starting debugging from the "execute" method. Coroutine debugging is briefly covered in the ZeroBrane Studio documentation: https://studio.zerobrane.com/doc-lua-debugging#coroutine-debugging.
Next we adapt the plugin configuration section we copied earlier to bin/kong.yml enabling
the new helloworld plugin:


Start kong on the Vagrant image


Now we are ready to start kong inside a vagrant ssh:

$ cd /kong/5.1/bin
$ lua kong start -c kong.yml

Output should be similar to:

[INFO] Using configuration: kong.yml
[INFO] Kong version.......0.5.2
       Proxy HTTP port....8000
       Proxy HTTPS port...8443
       Admin API port.....8001
       DNS resolver.......127.0.0.1:8053
       Database...........cassandra keepalive=60000 timeout=1000 replication_strategy=SimpleStrategy contact_points=localhost:9042 replication_factor=1 ssl_verify=false ssl=false data_centers= keyspace=kong
[INFO] Connecting to the database...
[INFO] dnsmasq started (dnsmasq)
[WARN] ulimit is currently set to "1024". For better performance set it to at least "4096" using "ulimit -n"
[OK] Started

If you later want to stop kong use

$ lua kong stop


Register the Mockbin service and the HelloWorld plugin using the Kong API


We are ready to interact with kong using SoapUI at the host. Alternatively you may also use curl, see http://streamdata.io/blog/developing-an-helloworld-kong-plugin/, just note that the API registration command described there is no longer valid. At this page you can also find hints about unit testing kong plugins.

If we check the /apis/ path at the kong API port we see that no API is defined yet:


So we register the mockbin service at https://mockbin.com as managed API inside kong


We can check whether the API was successfully registered:


Apply the HelloWorld plugin to the Mockbin Service


No plugin is bound to the Mockbin API yet:


If we now call the Mockbin service via Kong we get


The returned header is unchanged yet.

We bind our helloworld plugin to https://mockbin.com:


The default configuration (say_hello = true) is used in this case since we didn't transfer a configuration setting.


Call the Mockbin service via Kong


If we now again call the Mockbin service via Kong we get


We see our "Hello-World" header property set by the plugin code.
Now let's reconfigure the plugin (say_hello = false)


The Mockbin service via Kong now delivers


We see "By World!!!" in the returned header.


Debugging the Kong plugin


To enable debugging the plugin we start the ZeroBrane debug server inside ZeroBrane Studio (Project/Start Debugger Server) and set a breakpont inside access.lua (select the line and type F9).

When we now again call the Mockbin service via Kong inside SoapUI execution of the plugin will be interrupted at the break point:


We can step through the code and investigate the call stack and the contents of the variables in ZeroBrane Studio.


Direct installation of Kong (without using Vagrant)


Installation of kong directly in windows is not possible, but on MacOS a brew based installation is supported. First install homebrew, see https://github.com/Homebrew/homebrew/blob/master/share/doc/homebrew/Installation.md#installation .

On "El Capitan" you should adjust the access rights:
$ sudo chown $(whoami):admin /usr/local && sudo chown -R $(whoami):admin /usr/local

Then follow https://github.com/Mashape/homebrew-kong :
$ brew tap mashape/kong
$ brew install kong --with-cassandra

We observed some openssl related build problems, the following commands did fix it:
$ brew install openssl
$ brew link --force openssl
$ brew install kong --with-cassandra